Page Banner

DEP’s Remote Desktop Access User Guide

The Office of Technology and Information Services provides Remote Desktop Web as a service to DEP employees.  Approved employees have remote access to DEP’s network as well as standard desktop applications through a web browser interface.  Although the programs are actually running on a remote computer, to the user, they appear as if they are running on their local computer.

How do I obtain access?

Submit a Service Desk ticket to request access.  You can submit a ticket by emailing ServiceDesk@dep.state.fl.us, logging into the Service Desk customer portal ( https://servicedesk.dep.state.fl.us) or calling 850-245-7555.   Supervisor approval is required and must accompany your request. 

List of software available through standard Remote Desktop Services

  • Microsoft Office 2016 (Outlook, Word, PowerPoint, Excel, and Access)
  • Skype for Business 2016
  • Internet Explorer 11
  • Acrobat Reader XI
  • Snagit 13
  • Notepad
  • WordPad
  • Remote Desktop Connection
  • Mozilla Firefox
  • Google Chrome

How to login to Remote Desktop Services?

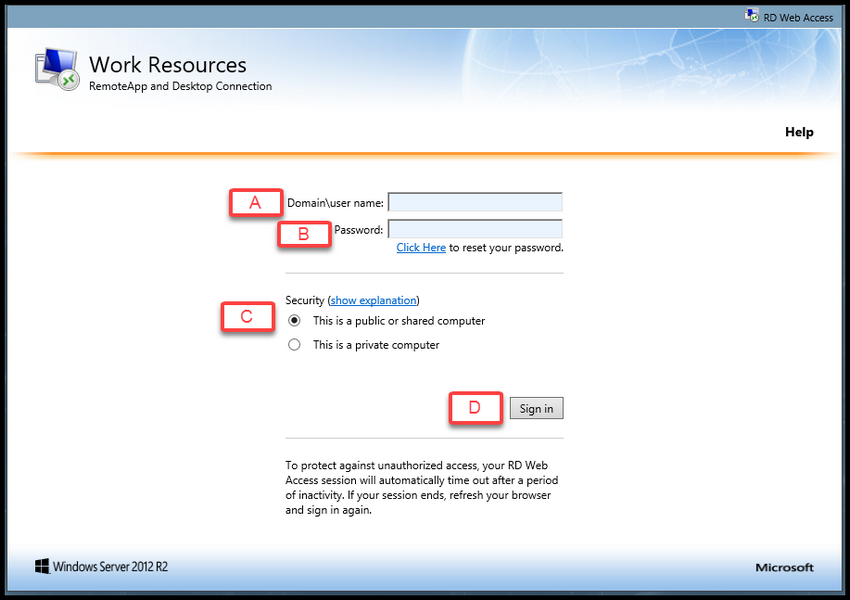
  1. Open Internet Explorer and go to: https://remotedesktop.dep.state.fl.us
    • In the domain\user name field type in: FloridaDEP\Your Username, example FloridaDep\Coyote_W.
      Note:  In order to login you must prefix your username with Floridadep\.
    • Type in your FloridaDEP password. This is the password you use to log into your computer each day.
    • Security options – Public vs Private
      • This is a public or shared computer.  If you are connecting to the remote desktop website using a computer in a public library, or from a computer that is shared by others, click This is a public or shared computer.  
      • This is a private computer.  If you are using a work computer assigned to you that you do not share with other people, click This is a private computer.  
    • Click on Sign in.

    User_Guide1

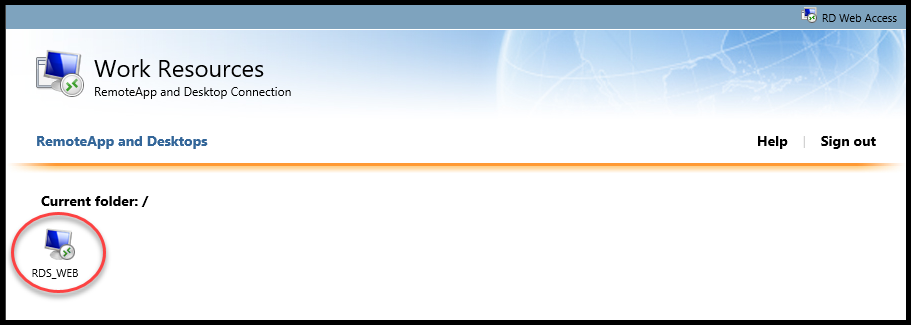
  2. Work Resources Window.
    • Click on the RDS_Web icon.

    User_Guide2

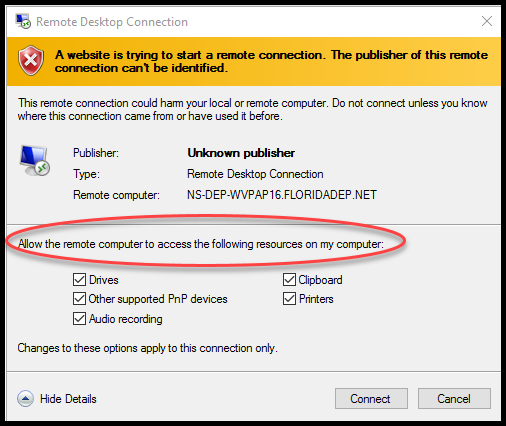
  3. Remote Desktop Connection window
    • Allow the remote computer to access the following resources on my computer. Select all the resources you wish to access (such as printing) on the local computer you used for connection. Check all that apply:
      • Drives
      • Other support PnP devices
      • Audio recording
      • Clipboard
      • Printing
    • Click on Connect.

      User_Guide3

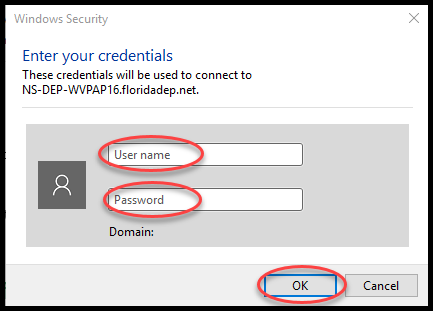
    • Enter your Username and Password and click on OK.

      User_Guide4

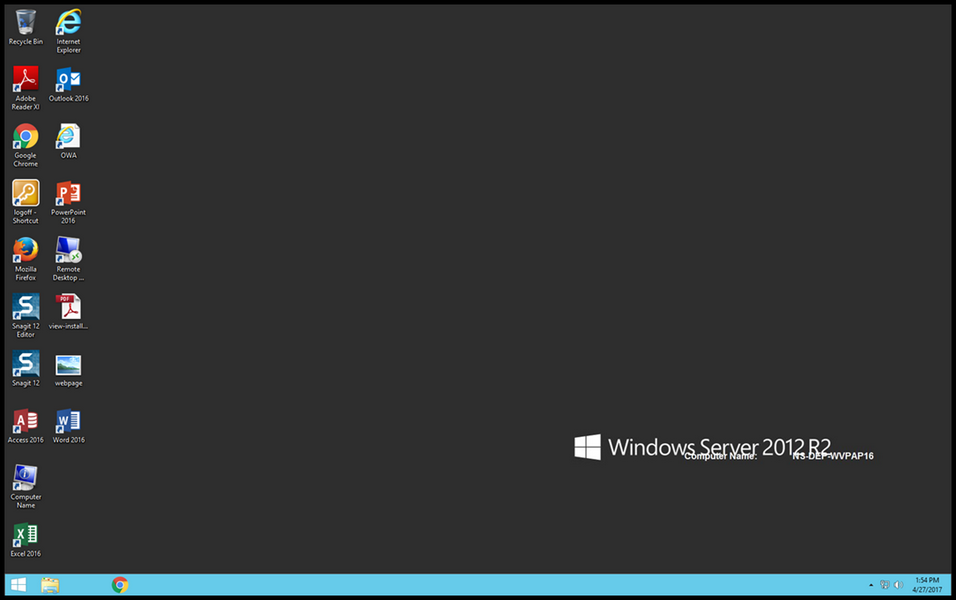
  4. After successfully connecting, you will see a screen similar to the one below. The new desktop looks and feels like Windows 8.1. Applications on the Remote Desktop work the same as applications on your regular computer. To open any of the applications on the desktop, place your mouse pointer on the application and double-click. You can log-off the Remote Desktop by double-clicking the "Logoff" shortcut.

    User_Guide5

  5. From this desktop, you can click on "Remote Desktop" to remotely connect to your local computer. See Computer setup requirements for remotely connecting to your office computer using Remote Desktop.
    • Click on the Remote Desktop Shortcut from the Windows Server 2012R2 desktop.
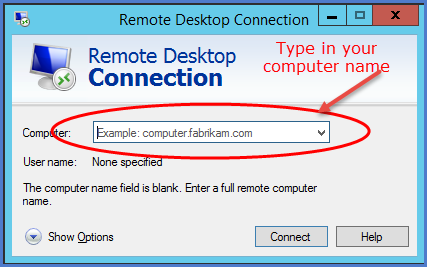
    • When prompted with the Remote Desktop Connection, type your computer name in the Computer field and click Connect

      User_Guide6

    • When prompted for your username/password. Type your Floridadep username (Example: Coyote_W) and network password to login.

Configuring Outlook for first time use in Remote Desktop Services

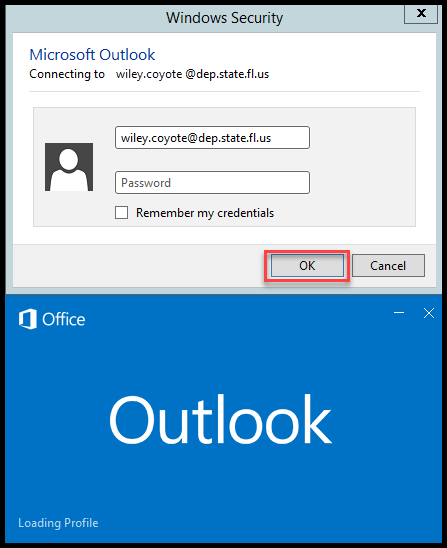
The first time you use Outlook in this new environment, you will be required to configure it for mail setup. Upon double-clicking the Outlook icon, you will be prompted to login. 

  1. Windows Security login window.
    • Verify the e-mail address is typed correctly.
    • Type in your FloridaDEP password and click OK to connect to Outlook.

      User_Guide7

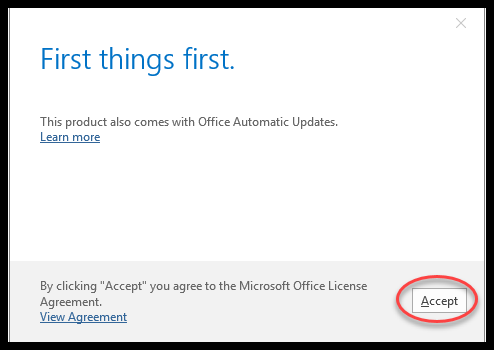
  2. First things first window. Click Accept.

    User_Guide8

How to add additional drive mappings to your Remote Desktop

  1. From the desktop, click on the file folder icon located on the task bar as displayed below.

  2. Windows File Manager.
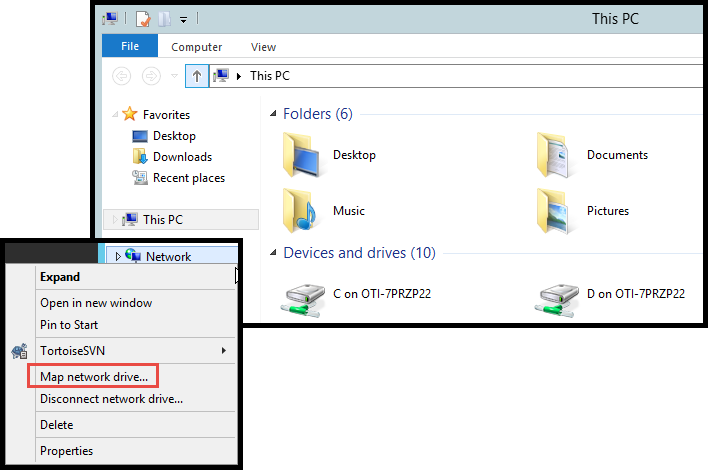
    • Right click on Network, select Map Network Drive.

      User_Guide10

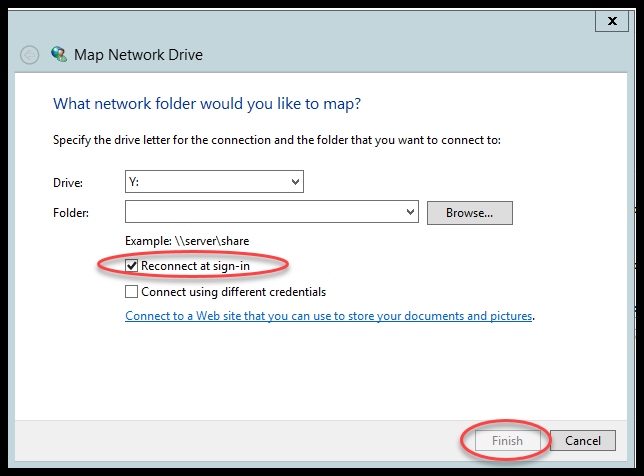
  3. Select Map Network Drive.
    • Drive: Select a drive letter that is not in use.
    • Folder: Type in the path of the network file share. Example:\\Fldep1\Temp_Common
    • Click on the box to Reconnect at sign-in.
    • Click Finish.

      User_Guide11

Computer setup requirements for remotely connecting to your office computer using Remote Desktop

To remotely connect to the computer located in your office, the below settings are required on your local computer:

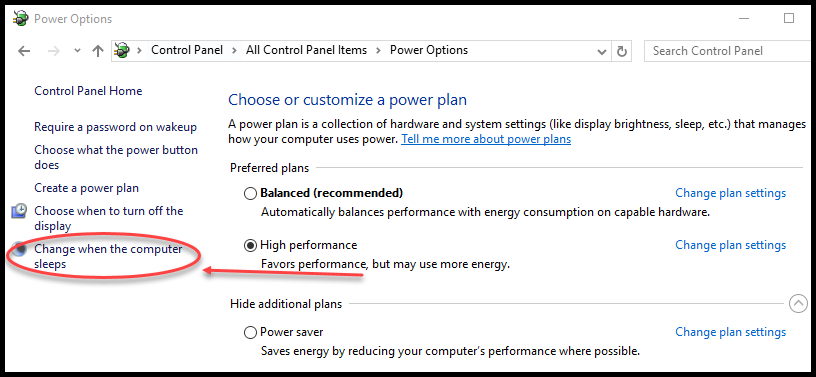
  1. Change Power Settings. To change settings:
    • Click on Start | Control Panel
    • Click on Power Options
    • Select Change when the computer sleeps

      User_Guide12

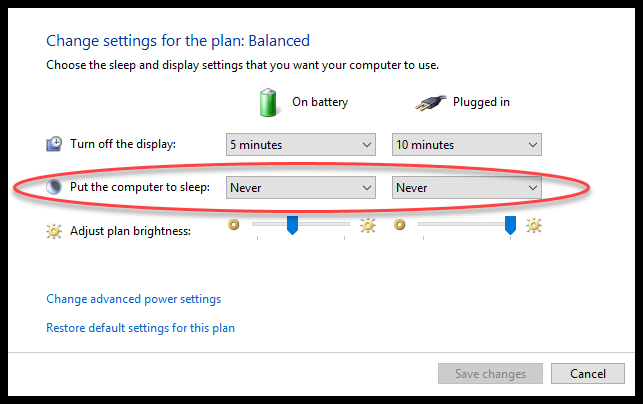
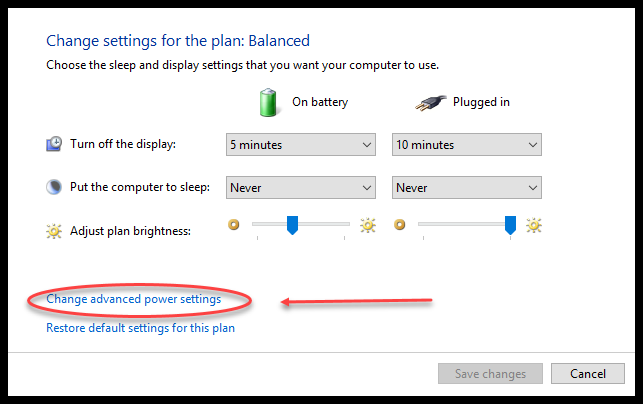
    • Under the Put the Computer to Sleep options, change the settings to Never for:
      • On Battery
      • Plugged in

      User_Guide13

    • Click Change advanced power settings:

      User_Guide14

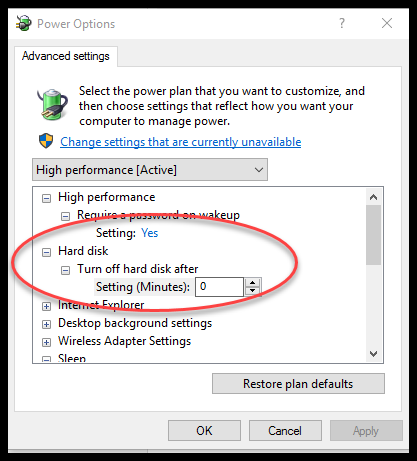
    • Change the settings for Hard Disk, turn off hard disk after, to 0:

      User_Guide15

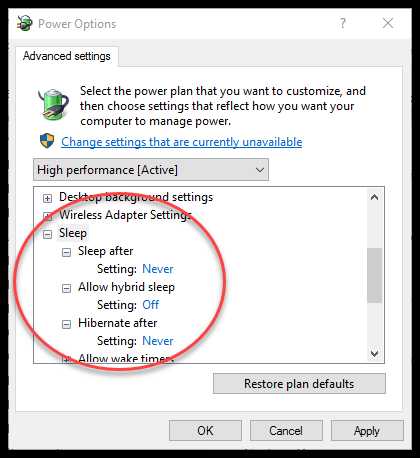
    • Under the Sleep options, change the settings to Never for:
      • Sleep after
      • Allow hybrid sleep
      • Hibernate after

      User_Guide16

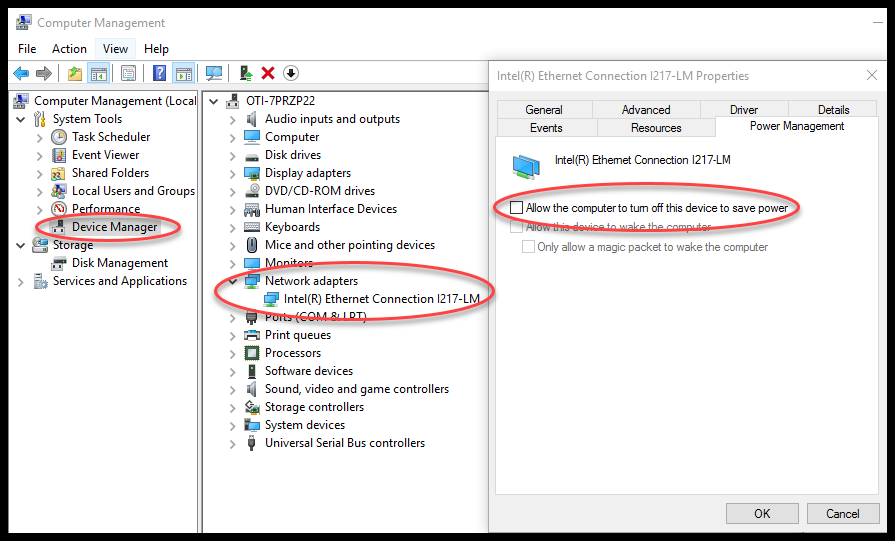
  2. Change Network Adapter settings. To change settings:
    • Right click on Start: Computer Management
    • Click on Device Manager
    • Click on Network adapters
    • Double click on the LAN adapter
    • Click on the Power Management tab
    • Uncheck Allow the computer to turn off this device to save power

    User_Guide17

  3. Computer must have power (i.e., do not turn off PC/power off at night).
  4. Must be a member of the Remote Desktop Users local group or set up as a local Administrator on the computer. Please contact the Service Desk with the following information to be added if you are not a member of either group.
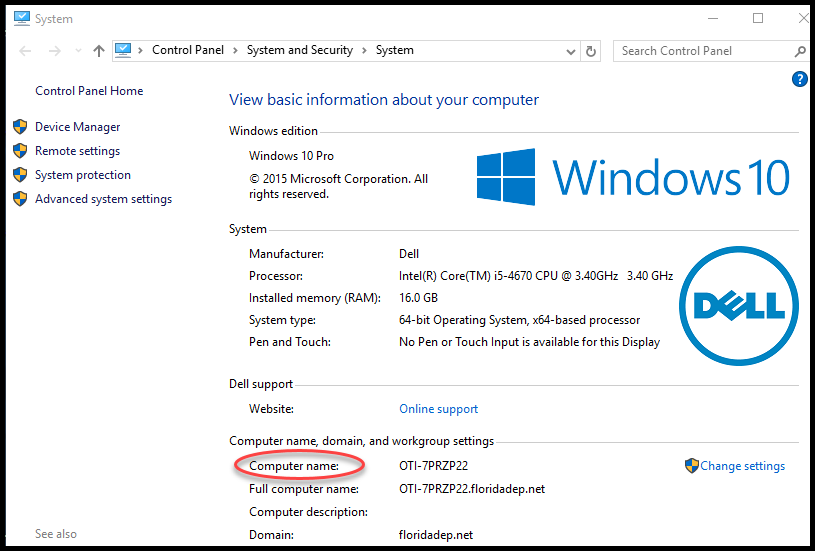
    • Must have Computer Name. To obtain your computer name:
    • Click on the Computer Name icon on your Desktop

      User_Guide19

    • Find Computer Name as shown below.

      User_Guide18

Last Modified:
March 18, 2024 - 1:05pm

Some content on this site is saved in an alternative format. The following icons link to free Reader/Viewer software:
PDF: | Word: | Excel: